# Import
After you start server, you need to fill it with your content. This process is very simple and requires minimal involvement
# Import directory management
Directory management window can be opened by clicking
Directory Management. In this window you can view list of added directories, delete and add new. Also, it is available to run selective import for individual directories with hints on which import mode will be run For convenience, in addition under each directory displays the amount of content that is imported from it
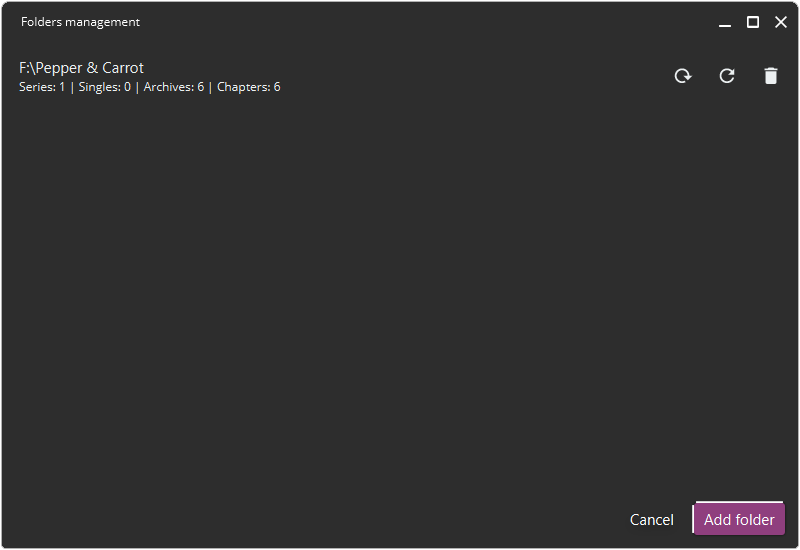
Directory management interface
# Adding a new directory
To add a new directory, in Directory Management window, click on Add Directory
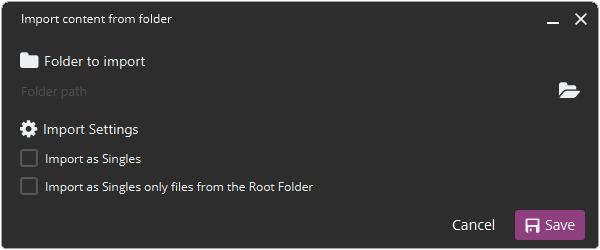
Adding directory interface
In Directory path field specify path to desired directory from which server will try to import content
Clicking on
# Import settings
Before adding a directory, you can configure some import parameters:
Import as Singles and Import as Singles only files from root directory settings may not be used if Metadata already exists in your files and has Status set to Single
# Import as Singles
Activating this option will force the server to import each file as a Single, creating a separate Serie for them ignoring any other import conditions (not automatically collecting Serie from subdirectories and ignoring status from Metadata). This option may be useful if your content is somehow catalogued (e.g., Oneshots by different authors sorted into directories), but you do not want the server to take this into account and not create incorrect Series
# Import as Singles only files from root directory
Activating this option will force server to import each file in root of specified directory as a Single, creating a separate Serie for them. This option may be useful if your content consists of both Series and Singles/Oneshots and you want to import them without creating incorrect Series
# Import process
Clicking
Save in the add directory dialog box will start import process on server. This process is quite fast (~20 archives/sec in single-threaded mode and up to 40 archives/sec in multi-threaded mode) During import process server reads Metadata from archives, searches for and prepares covers, generates chapter lists and automatically creates Series from files in subdirectories
The server is not blocked while the importing is in progress, so it can be used as usual
If a file has Metadata written on it and its status is Single, server will automatically import that file as Single, even if it is placed in a subdirectory with other files
# Caching covers (generating previews)
When import process is over, cover art caching (preview generation) service will automatically start for all imported files for which no cover art is available. This operation takes considerably longer, because it is necessary to extract the cover from each archive, decode it, reduce its size and save it to disk. Server is also not blocked at this point
# Choosing cover of Archive
Selecting a cover from archive is done according to some criteria (with priority from top to bottom):
- image has name
00000.<extension>. - image has word
coverin its name - image is first in list with a supported extension:
jpg,jpeg,png,bmp,webp
# Choosing cover of Serie
By default, cover of Serie becomes cover of first Archive
It is also possible to provide an alternative cover with name cover.<extension>, where extension> can be one of: jpg, jpeg, png, bmp, webp. The cover must be placed in directory with other files that will be collected into Serie
If option Allow loading lists with volumes is enabled, server will replace cover of Serie with cover of first unread Archive

Automatic cover change
# Selecting cover of remaining files
For PDF and Djvu cover will be first page of book
For ePub cover will be cover from OPF book metadata or first image in archive
For FB2 cover will be cover from metadata
# Deleting directory
To delete a directory, click